سرور مجازی با کانفیگ ویژه IPsec VPN, L2TP VPN , Brook , Cisco anyConnect , Telegram MTProxy , ShadowSocks
جهت سفارش سرورIPsec & L2TP VPN با کنترل IBsng بر روی همین لینک کلیک نمایید.
جهت سفارش سرورIPsec & L2TP VPN با کنترل IBsng بر روی همین لینک کلیک نمایید.
جهت سفارش سرور IKev2 با کنترل IBsng بر روی همین لینک کلیک نمایید.
Configure IPsec/L2TP VPN Clients
Windows
Windows 10 and 8.x
- Right-click on the wireless/network icon in your system tray.
- Select Open Network and Sharing Center. Or, if using Windows 10 version 1709 or newer, select Open Network & Internet settings, then on the page that opens, click Network and Sharing Center.
- Click Set up a new connection or network.
- Select Connect to a workplace and click Next.
- Click Use my Internet connection (VPN).
- Enter
Your VPN Server IPin the Internet address field. - Enter anything you like in the Destination name field, and then click Create.
- Return to Network and Sharing Center. On the left, click Change adapter settings.
- Right-click on the new VPN entry and choose Properties.
- Click the Security tab. Select "Layer 2 Tunneling Protocol with IPsec (L2TP/IPSec)" for the Type of VPN.
- Click Allow these protocols. Check the "Challenge Handshake Authentication Protocol (CHAP)" and "Microsoft CHAP Version 2 (MS-CHAP v2)" checkboxes.
- Click the Advanced settings button.
- Select Use preshared key for authentication and enter
Your VPN IPsec PSKfor the Key. - Click OK to close the Advanced settings.
- Click OK to save the VPN connection details.
Note: A one-time registry change is required before connecting. See details below.
Alternatively, instead of following the steps above, you may create the VPN connection using these Windows PowerShell commands. Replace Your VPN Server IP and Your VPN IPsec PSK with your own values, enclosed in single quotes:
# Disable persistent command history
Set-PSReadlineOption –HistorySaveStyle SaveNothing
# Create VPN connection
Add-VpnConnection -Name 'My IPsec VPN' -ServerAddress 'Your VPN Server IP' -L2tpPsk 'Your VPN IPsec PSK' -TunnelType L2tp -EncryptionLevel Required -AuthenticationMethod Chap,MSChapv2 -Force -RememberCredential -PassThru
# Ignore the data encryption warning (data is encrypted in the IPsec tunnel)
Windows 7, Vista and XP
- Click on the Start Menu and go to the Control Panel.
- Go to the Network and Internet section.
- Click Network and Sharing Center.
- Click Set up a new connection or network.
- Select Connect to a workplace and click Next.
- Click Use my Internet connection (VPN).
- Enter
Your VPN Server IPin the Internet address field. - Enter anything you like in the Destination name field.
- Check the Don't connect now; just set it up so I can connect later checkbox.
- Click Next.
- Enter
Your VPN Usernamein the User name field. - Enter
Your VPN Passwordin the Password field. - Check the Remember this password checkbox.
- Click Create, and then Close.
- Return to Network and Sharing Center. On the left, click Change adapter settings.
- Right-click on the new VPN entry and choose Properties.
- Click the Options tab and uncheck Include Windows logon domain.
- Click the Security tab. Select "Layer 2 Tunneling Protocol with IPsec (L2TP/IPSec)" for the Type of VPN.
- Click Allow these protocols. Check the "Challenge Handshake Authentication Protocol (CHAP)" and "Microsoft CHAP Version 2 (MS-CHAP v2)" checkboxes.
- Click the Advanced settings button.
- Select Use preshared key for authentication and enter
Your VPN IPsec PSKfor the Key. - Click OK to close the Advanced settings.
- Click OK to save the VPN connection details.
Note: This one-time registry change is required if the VPN server and/or client is behind NAT (e.g. home router).
To connect to the VPN: Click on the wireless/network icon in your system tray, select the new VPN entry, and click Connect. If prompted, enter Your VPN Username and Password, then click OK. You can verify that your traffic is being routed properly by looking up your IP address on Google. It should say "Your public IP address is Your VPN Server IP".
OS X
- Open System Preferences and go to the Network section.
- Click the + button in the lower-left corner of the window.
- Select VPN from the Interface drop-down menu.
- Select L2TP over IPSec from the VPN Type drop-down menu.
- Enter anything you like for the Service Name.
- Click Create.
- Enter
Your VPN Server IPfor the Server Address. - Enter
Your VPN Usernamefor the Account Name. - Click the Authentication Settings button.
- In the User Authentication section, select the Password radio button and enter
Your VPN Password. - In the Machine Authentication section, select the Shared Secret radio button and enter
Your VPN IPsec PSK. - Click OK.
- Check the Show VPN status in menu bar checkbox.
- (Important) Click the Advanced button and make sure the Send all traffic over VPN connection checkbox is checked.
- Click the TCP/IP tab, and make sure Link-local only is selected in the Configure IPv6 section.
- Click OK to close the Advanced settings, and then click Apply to save the VPN connection information.
To connect to the VPN: Use the menu bar icon, or go to the Network section of System Preferences, select the VPN and choose Connect. You can verify that your traffic is being routed properly by looking up your IP address on Google. It should say "Your public IP address is Your VPN Server IP".
Android
- Launch the Settings application.
- Tap More... in the Wireless & Networks section.
- Tap VPN.
- Tap Add VPN Profile or the + icon at top-right of screen.
- Enter anything you like in the Name field.
- Select L2TP/IPSec PSK in the Type drop-down menu.
- Enter
Your VPN Server IPin the Server address field. - Leave the L2TP secret field blank.
- Leave the IPSec identifier field blank.
- Enter
Your VPN IPsec PSKin the IPSec pre-shared key field. - Tap Save.
- Tap the new VPN connection.
- Enter
Your VPN Usernamein the Username field. - Enter
Your VPN Passwordin the Password field. - Check the Save account information checkbox.
- Tap Connect.
Once connected, you will see a VPN icon in the notification bar. You can verify that your traffic is being routed properly by looking up your IP address on Google. It should say "Your public IP address is Your VPN Server IP".
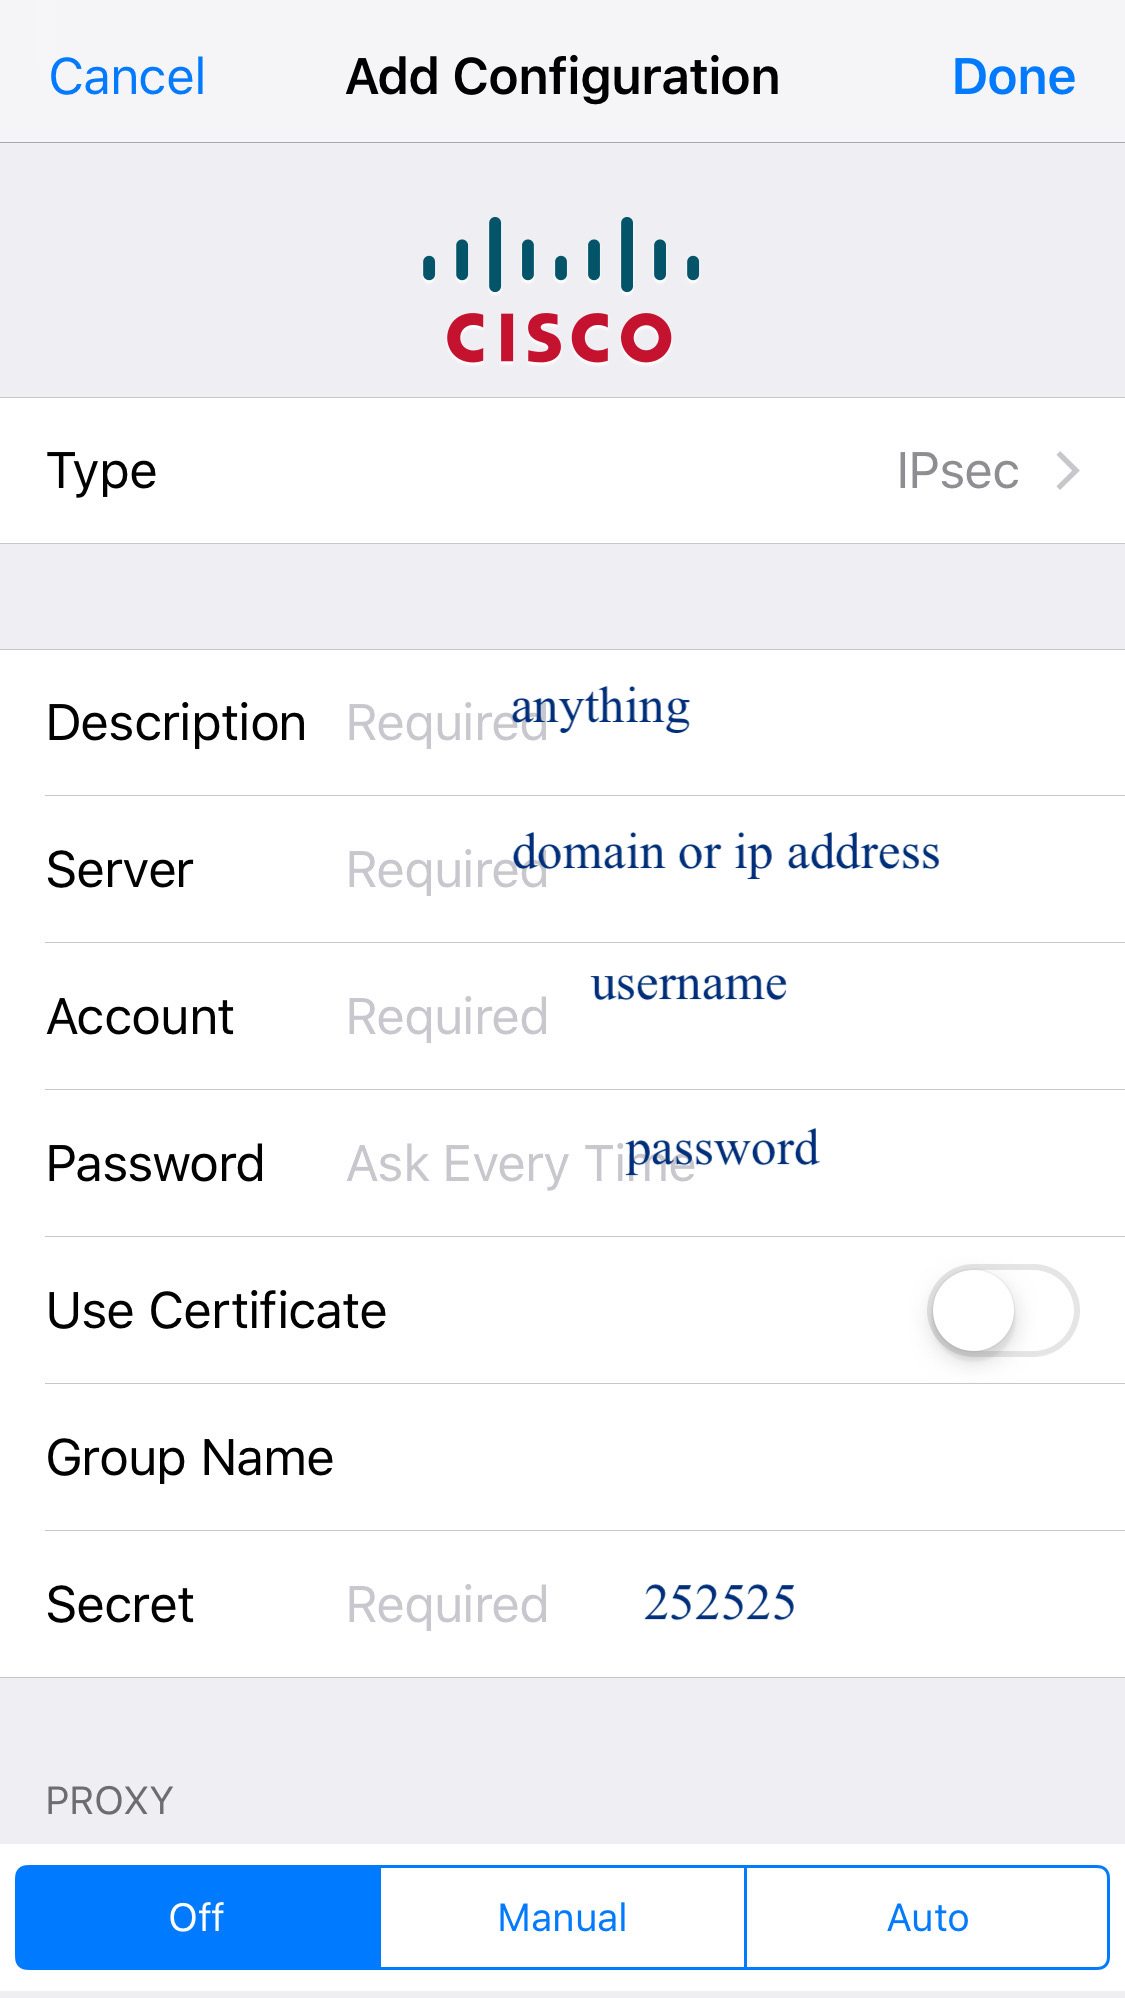
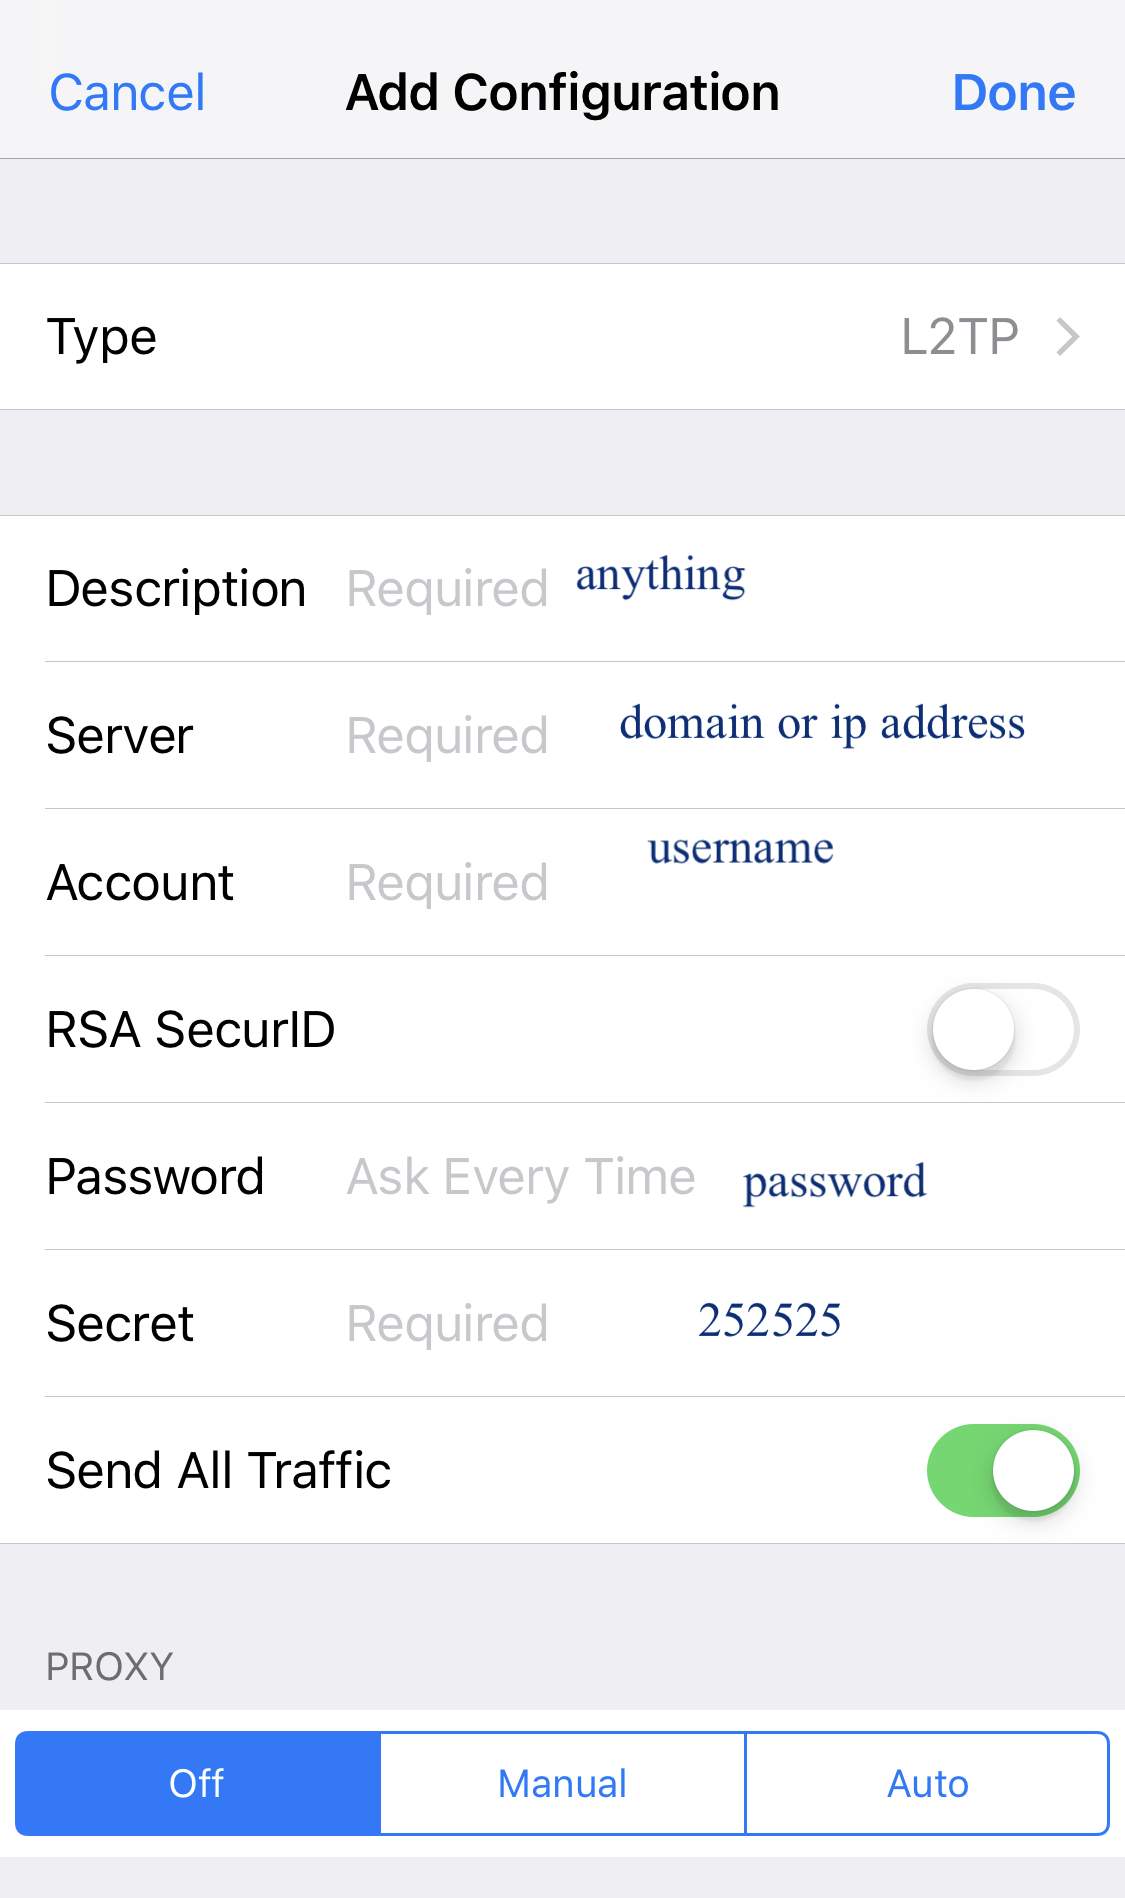
iOS
- Go to Settings -> General -> VPN.
- Tap Add VPN Configuration....
- Tap Type. Select L2TP and go back.
- Tap Description and enter anything you like.
- Tap Server and enter
Your VPN Server IP. - Tap Account and enter
Your VPN Username. - Tap Password and enter
Your VPN Password. - Tap Secret and enter
Your VPN IPsec PSK. - Make sure the Send All Traffic switch is ON.
- Tap Done.
- Slide the VPN switch ON.
Once connected, you will see a VPN icon in the status bar. You can verify that your traffic is being routed properly by looking up your IP address on Google. It should say "Your public IP address is Your VPN Server IP".
Chromebook
- If you haven't already, sign in to your Chromebook.
- Click the status area, where your account picture appears.
- Click Settings.
- In the Internet connection section, click Add connection.
- Click Add OpenVPN / L2TP.
- Enter
Your VPN Server IPfor the Server hostname. - Enter anything you like for the Service name.
- Make sure Provider type is L2TP/IPSec + pre-shared key.
- Enter
Your VPN IPsec PSKfor the Pre-shared key. - Enter
Your VPN Usernamefor the Username. - Enter
Your VPN Passwordfor the Password. - Click Connect.
Configure IPsec/XAuth VPN Clients
Windows
Note: You may also connect using IPsec/L2TP mode. No additional software is required.
- Download and install the free Shrew Soft VPN client.
Note: This VPN client supports Windows 2K/XP/Vista/7/8. - Click Start Menu -> All Programs -> ShrewSoft VPN Client -> VPN Access Manager
- Click the Add (+) button on toolbar.
- Enter
Your VPN Server IPin the Host Name or IP Address field. - Click the Authentication tab. Select Mutual PSK + XAuth from the Authentication Method drop-down menu.
- Under the Local Identity sub-tab, select IP Address from the Identification Type drop-down menu.
- Click the Credentials sub-tab. Enter
Your VPN IPsec PSKin the Pre Shared Key field. - Click the Phase 1 tab. Select main from the Exchange Type drop-down menu.
- Click the Phase 2 tab. Select sha1 from the HMAC Algorithm drop-down menu.
- Click Save to save the VPN connection details.
- Select the new VPN connection. Click the Connect button on toolbar.
- Enter
Your VPN Usernamein the Username field. - Enter
Your VPN Passwordin the Password field. - Click Connect.
Once connected, you will see tunnel enabled in the VPN Connect status window. Click the "Network" tab, and confirm that Established - 1 is displayed under "Security Associations". You can verify that your traffic is being routed properly by looking up your IP address on Google. It should say "Your public IP address is Your VPN Server IP".
OS X
- Open System Preferences and go to the Network section.
- Click the + button in the lower-left corner of the window.
- Select VPN from the Interface drop-down menu.
- Select Cisco IPSec from the VPN Type drop-down menu.
- Enter anything you like for the Service Name.
- Click Create.
- Enter
Your VPN Server IPfor the Server Address. - Enter
Your VPN Usernamefor the Account Name. - Enter
Your VPN Passwordfor the Password. - Click the Authentication Settings button.
- In the Machine Authentication section, select the Shared Secret radio button and enter
Your VPN IPsec PSK. - Leave the Group Name field blank.
- Click OK.
- Check the Show VPN status in menu bar checkbox.
- Click Apply to save the VPN connection information.
To connect to the VPN: Use the menu bar icon, or go to the Network section of System Preferences, select the VPN and choose Connect. You can verify that your traffic is being routed properly by looking up your IP address on Google. It should say "Your public IP address is Your VPN Server IP".
 Click here for amazing deals! Every Week a special offer for you! By our Channel